Craft Room Makeover: How I Organized My Creative Space on a Budget
- amydarley
- May 5
- 7 min read

Disclosure: This post contains affiliate links, which means I may earn a small commission at no extra cost to you. I only share products I personally use and love. Thank you for supporting my blog! 💕
Y'all, I have been avoiding this room in my house for SO long. It's upstairs in our playroom, so thankfully not many people ever see it — but every time I walked past the door, I felt this little pinch of guilt because I knew it was a complete disaster zone.
This is one of those projects I kept putting off because I knew it was going to be a beast. It's a shared craft area for me and my daughter, Gracie June, and we both use it constantly. She loves anything creative — drawing, painting, making bracelets — and I use it for all my Cricut projects, heat press gifts, and personalized presents for teachers, coaches, and friends.
But here's the thing: there was no organization system. Stuff just got dumped wherever it landed. I had tried to organize it before, but nothing was sticking. So today, we're tackling it. A full craft room makeover — and I am OBSESSED with how it turned out. I can't wait to show you.
🎥 Want to watch the full makeover? Catch the video on my YouTube channel for the whole step-by-step process!
The Before: A Whole Lot of Chaos
Let's just rip the bandaid off. Here's what we were working with:
I'm not going to sugarcoat it — it was bad. We had a six-cube organizer that was overflowing, drawers stuffed with vinyl rolls that wouldn't open properly, leftover supplies from past projects piled on top of the table, and stuff just falling behind drawers because there was nowhere for it to go.
I always say it gets worse before it gets better when you're doing a real declutter and organize project. And this one was no exception.
Step 1: Clearing Everything Out
The first thing I did was completely empty the space. Every drawer, every shelf, every corner — everything came out and got placed on the floor of the playroom.
Here's a tip that saved me so much time: as I pulled things out, I tried to keep like items together. Vinyl with vinyl, beads with beads, fabric with fabric. That way when it came time to organize, I could see exactly what I had and figure out what kind of system I needed.
I also pulled out the old six-cube organizer because I had a brand-new metal cabinet to put in its place — more on that in a second.
Step 2: The Game-Changing Metal Cabinet
My husband Chance assembled this for me a couple of days before, and it really did not take him long. The cabinet I got is 75 inches tall and 36 inches wide. They have other heights too — 71 inch, 61 inch, and 47 inch — but I went with the biggest one because I knew I had A LOT to organize.
👉 I got my cabinet on TikTok Shop for around $165 (and it's even cheaper now if you catch it on sale). They also have similar ones on Amazon if you prefer to shop there.
Why I love TikTok Shop for stuff like this: they almost always have a deal running. I got mine at a discount, and I see they're running an even better one right now. Worth checking before you buy!
Step 3: Reorganizing the Vinyl (My Favorite Trick)
Okay, this is the part of the makeover I am most proud of. The biggest issue I had with my old vinyl storage was that I had it all in rolls. Every time I'd unroll a piece and roll it back up, the drawers would barely close. It was a nightmare.
My solution? Switch to flat sheets in the smaller drawers, and keep the rolls in the bigger drawers.
Here's exactly how I broke it down in the smaller drawers:
Top drawer: Glitter heat transfer vinyl (flat sheets)
Second drawer: Regular heat transfer vinyl (flat sheets)
Third drawer: Regular vinyl flat sheets — small sheets on the right, larger on the left
Fourth drawer: Vinyl scraps and transfer paper scraps
Fifth drawer: Cricut tools — Teflon sheets, heat press mat, extra cutting mats
Bottom drawer: Cricut printable materials — sticker paper, chipboard, etc.
And in the bigger metal drawers? All my vinyl rolls, sorted by type:
Bottom drawer: Regular vinyl rolls
Middle drawer: Heat transfer vinyl rolls
Top drawer: Smart vinyl + Cricut Joy vinyl
Y'all are probably going to come at me for this, but I did NOT color-code the vinyl. Honestly? It really doesn't take that long to glance through and find the color I need. But if you wanted to take it a step further, you could absolutely use drawer dividers to separate by color.
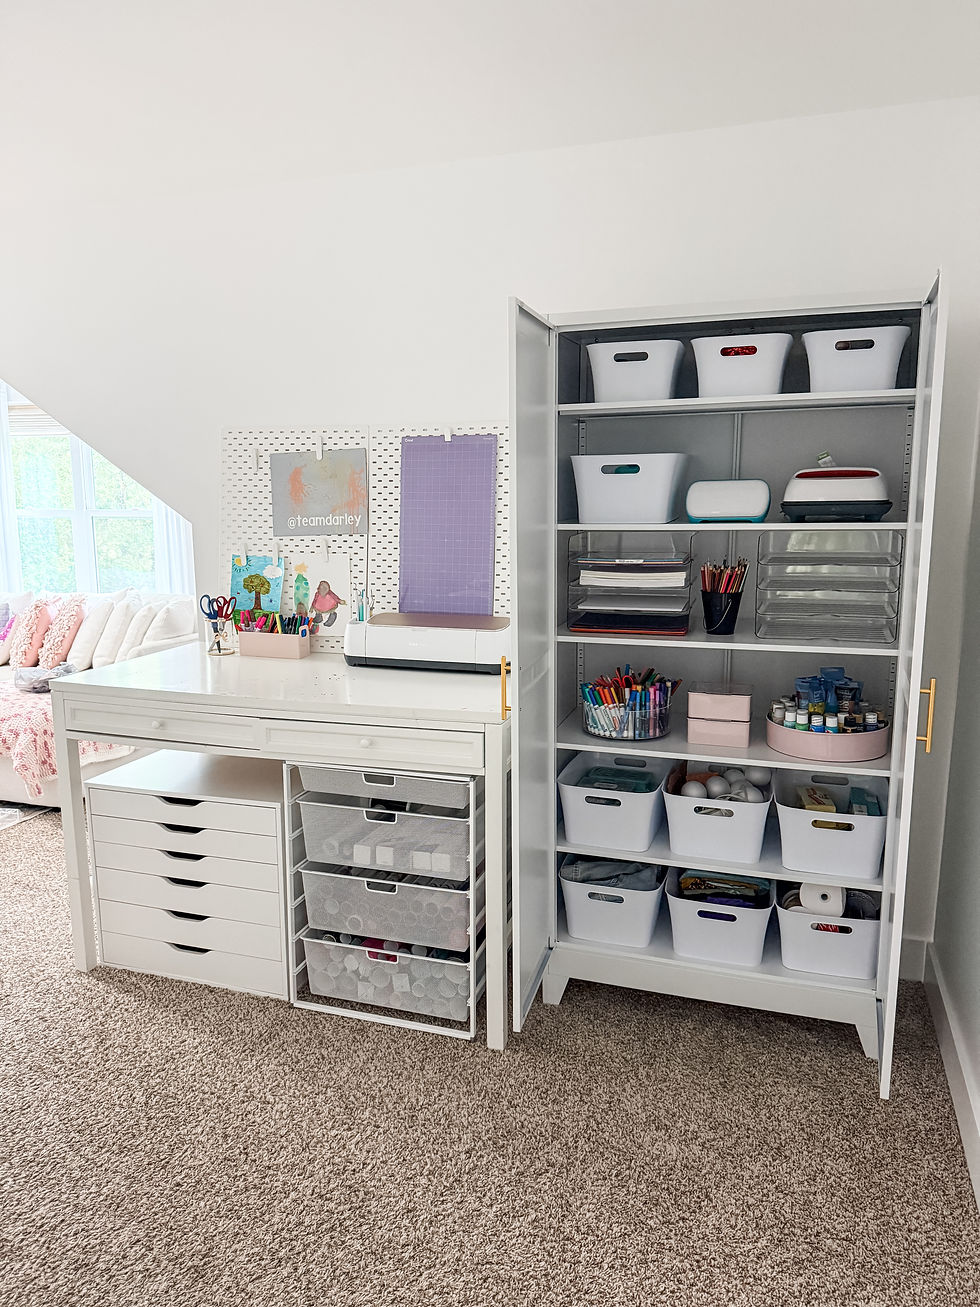
Step 4: Organizing the Cabinet With Labeled Baskets
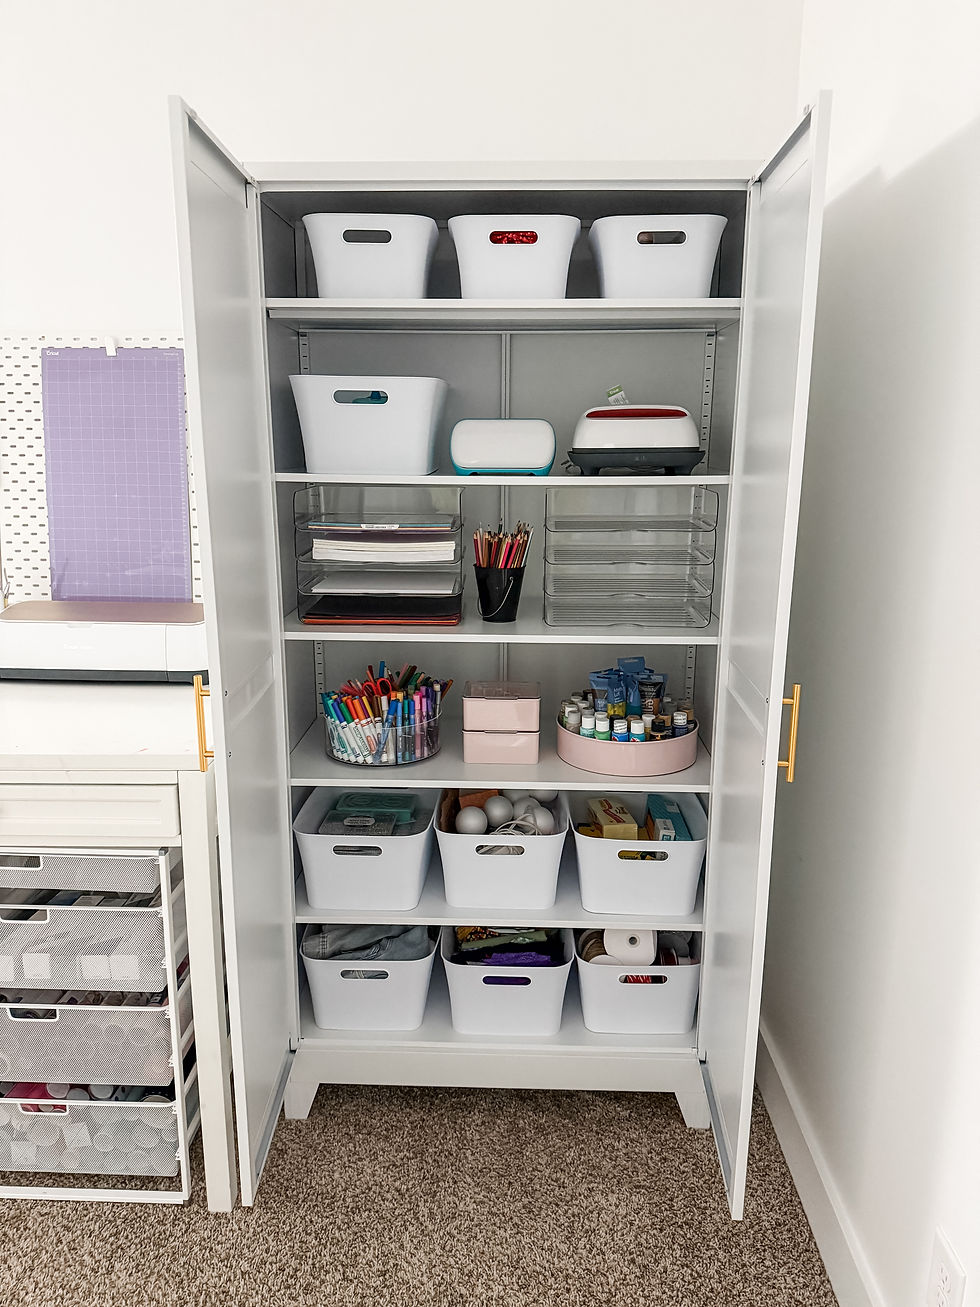
Now for the cabinet itself. I picked up two sizes of white baskets — bigger ones for the bottom shelves where I store stuff we use often, and smaller ones for the top shelf with things we don't reach for as much.
Here's how I organized each basket:
Ribbon and yarn: Mostly for gift-giving — bows, Christmas wrapping, etc.
Extra school supplies: Pencils, crayons, markers, extra paper
Glitter and paint supplies: Paint brushes, palettes, all the messy fun stuff
Beads and bead accessories: Perfect for when Gracie June and her friends want to make bracelets — they can pull the whole basket out
Clothes pins and crafts: The girls love decorating these for cheer competitions, plus popsicle sticks and ribbons
Items to personalize for gifts: Koozies, car tags, ornaments, blank items ready for the Cricut
Balloon pump + heat press tools: Mini heat press, Cricut cords, balloons
Fabric: For fabric bracelets and other projects
Extra t-shirts and jackets: Blanks for heat press projects
Hot glue guns and adhesives: All in one spot, finally
I'm honestly debating whether to add labels to the white bins or leave them as-is. I love the way it looks now, but labels would help everyone in the family know exactly where things go. I'm leaning toward labeling. (Y'all let me know what you would do!)
My Top Organization Tip: Frequency-Based Placement
When I was filling the cabinet back up, I made one important rule: things we reach for often go on the lower shelves, and things we use less often go up top.
It sounds basic, but this single decision keeps the whole system working. When something is easy to grab, it actually gets put back. When you have to climb on a chair to reach the everyday stuff? That's how things end up dumped on the table again.
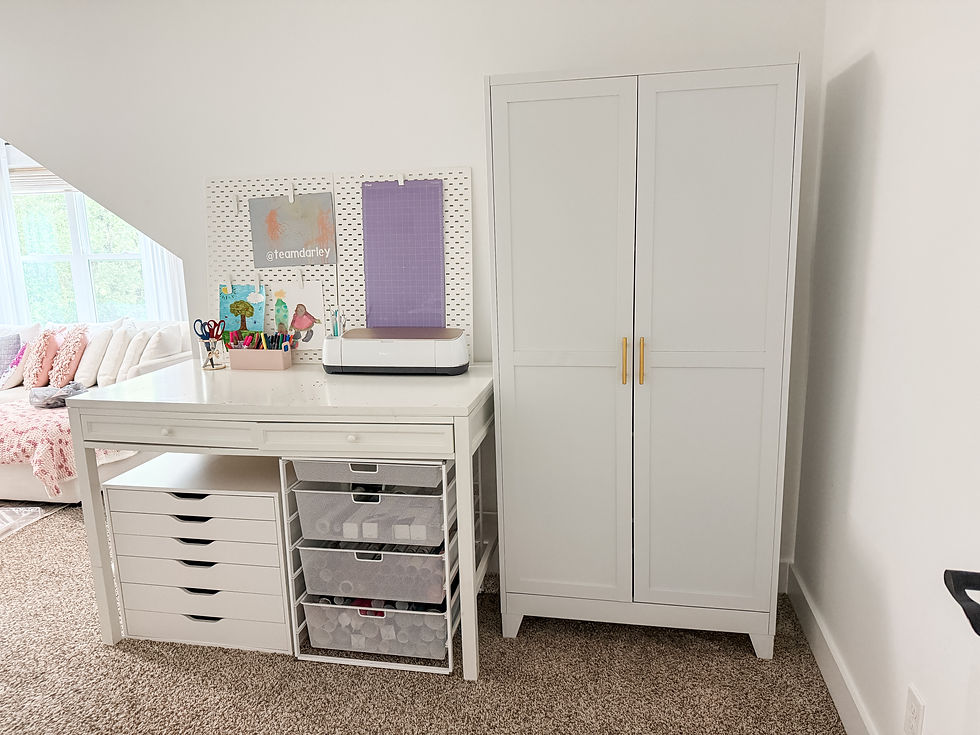
The After: I'm Obsessed
Looking at this room now versus what it was, I literally can't believe it's the same space. Every single thing has a home. The drawers actually OPEN. The cabinet looks like something out of a magazine. And most importantly — Gracie June and I can both find what we need in seconds.
I also kept my pegboards leaning against the wall behind the desk instead of mounting them. I thought about putting them up but ultimately didn't want to put more holes in the wall, and they've been working just fine leaning there for years. And my little 'Team Darley' sign — that's from when I started my YouTube channel eight years ago. I love that it gets to live in this space as a little reminder of where this all started. ❤️
Shop My Craft Room Organization
Y'all have been asking me to link the products I used, so I put together a full collection of everything you see in this craft room makeover.

👉 Shop the entire craft room makeover on LTK — every basket, drawer organizer, and tool is linked!
And if you specifically want the metal cabinet, here's where I got it:
75-inch Metal Cabinet on TikTok Shop — $165 (and on sale!)
Frequently Asked Questions About a Craft Room Makeover
How long did the craft room makeover take?
From start to finish, the makeover took me about a full day — probably 6 to 8 hours including cleaning out everything, sorting, decluttering, and reorganizing. The longest part was actually going through every single thing and deciding what to keep versus donate. If you're tackling something similar, plan for a whole day and don't try to squeeze it in around other tasks. Give yourself permission to make a bigger mess before it gets better.
Where did you get the metal cabinet?
I got mine on TikTok Shop for around $165 — they have heights ranging from 47 inches up to 75 inches. I went with the 75-inch one because I had so much to organize. Amazon also has very similar cabinets if you prefer to shop there. (Pro tip: TikTok Shop almost always has a coupon code or sale, so it's worth checking the prices side by side.)
Should I label my craft room bins?
Honestly? Yes — but only after you've lived with the system for a week or two. I'm waiting to label mine until I'm 100% sure I love the layout. Once you know your system is working, labels make everything easier (especially for kids and other family members). The nice thing about vinyl labels is you can always remove and re-do them if you decide to reorganize.
Do I need a Cricut to make personalized gifts?
You don't NEED one, but it sure makes things easier. I use mine for everything from teacher gifts to coach appreciation tags to coozies and ornaments. If you're new to Cricut, the Cricut Joy is a great entry-level option — it's small, affordable, and easy to use. The bigger machines (like the Maker series) are more versatile if you want to cut more materials.
How do you keep a craft room organized long-term?
Three things: (1) Give every single item a home — if you don't know where something goes, you'll just dump it. (2) Put things you use most often within easy reach. (3) Do a 5-minute reset every time you finish a project. The reason my old space stayed messy was because I'd finish a project and walk away. Now we put things back as we go.
Final Thoughts: Just Tackle It
If you have a project like this that you've been putting off — a craft room, a closet, a pantry, a garage — let this be your sign. I procrastinated this for SO long because I knew it was going to take a full day. But now that it's done, I'm kicking myself for not doing it sooner.
The hardest part is just starting. Pick a Saturday, put on a good audiobook or podcast, and rip the bandaid off. You'll be SO glad you did.
Want more home organization inspiration? Find me on YouTube for room makeovers and cleaning videos, and on Instagram for daily home and lifestyle content. You can also shop my home favorites on my Amazon Storefront or my LTK page.
You've got this, mama. Now go tackle that room. 💕


Love that you and Gracie June are sharing the space — it’s so cute how craft time can double as bonding time. I've been looking for budget-friendly storage ideas that actually hold kids’ supplies without looking ugly. https://framepack-ai.com
Love that this is a shared space with your daughter! A budget-friendly craft room makeover is always inspiring — I've been using https://3mf-to-stl.org
Love that you're making this a shared space with Gracie June — it's so sweet how kids mirror their parents' creativity! I've been using https://3d-ai-generator.com
Shared craft spaces are so hard to keep organized! Love that you and Gracie June are tackling this together. I've been using https://image-gpt.net
관리 과정이 전문적이고 안정적으로 진행되어 좋았습니다. 수원출장마사지 이용 후 몸 상태가 개선되고 일상생활의 피로도도 줄어든 것 같습니다.